
Twenty-three millimetres—that’s the exact gap I stared at last Tuesday when a brand-new Vitra S50 pan refused to sit flush against a newly tiled wall in a Lewisham loft conversion. The client had already spent £1,800 on Italian tiles and £420 on the toilet, yet a pencil-thin void was about to torpedo the whole aesthetic. One hour, a £4.50 pack of colour-matched plastic spacer wedges, and a careful re-torque of the pan-to-waste union later, the suite looked factory-perfect. That hairline gap is why I’m writing this: most DIY guides gloss over the millimetres that separate “it works” from “it looks fitted by a pro.”
I’ve been a City & Guilds Level 3 plumber and Part P-registered bathroom fitter for 12 years, with 1,400+ close-coupled, wall-hung and back-to-wall pans on my tally sheets. I’ve seen pans crack because someone used 3 Nm of torque instead of 6, and I’ve rescued £900 Geberit frames from being ripped out when the flush pipe was 5 mm short. The Lewisham job is fresh in my mind because it’s the perfect example of how tiny details snowball—exactly what this walkthrough will stop from happening to you.
Quick Steps:
1. Measure soil pipe centre to finished wall (not stud—tiles count).
2. Dry-fit pan with no wax; mark foot bolt holes and outline.
3. Check pan spigot depth vs rubber connector—trim if >10 mm gap.
4. Bed pan on 6 mm bead of silicone, not plumbers’ mastic—sets faster.
5. Torque retaining bolts to 5–6 Nm, then nip ¼ turn after 24 h cure.
Choosing the Right Pan and Cistern Combo
Toilets look interchangeable until you try to marry a 480 mm projection pan with a 600 mm depth alcove. Start with rough-in dimension: UK soil pipes sit 140 mm or 170 mm from the finished wall, but add 20–30 mm if you’re tiling over tile. I keep a “go/no-go” gauge cut from 6 mm ply: 140 mm, 170 mm and 190 mm notches. Hold it against the wall; if the spigot lands between notches, pick a different pan or order a flexible pan connector (£8–£12, Screwfix item 7893F).
Close-coupled kits dominate the market because they’re cheap—B&Q’s Cooke & Lewis Turin CC is £89 in the 2025 spring catalogue—but they sacrifice space. Wall-hung frames like the Geberit Duofix 112 cm (Screwfix £268) free up floor area and let you set the height anywhere from 390 mm to 460 mm rim height, great for households with tall or mobility-restricted users. Back-to-wall pans hide the cistern in furniture or a stud wall; Twyford Encore BTW is £155 at Plumbfix and pairs with a 6 litre Slimline cistern (£65). My rule: if the bathroom is under 5 m², go wall-hung; above that, aesthetics beat the extra £180 cost of the frame.
Cistern capacity matters less since 2016 water regs capped single flush at 6 litres, but dual-flush valves still vary. Fluidmaster’s 3/6 litre drop valve (Toolstation £22) gives a positive click; cheap unbranded valves often stick open and waste 150 litres per day—I logged that on a datalogger in a Catford rental last year. Spend the extra £8; it pays for itself in three months on a meter.
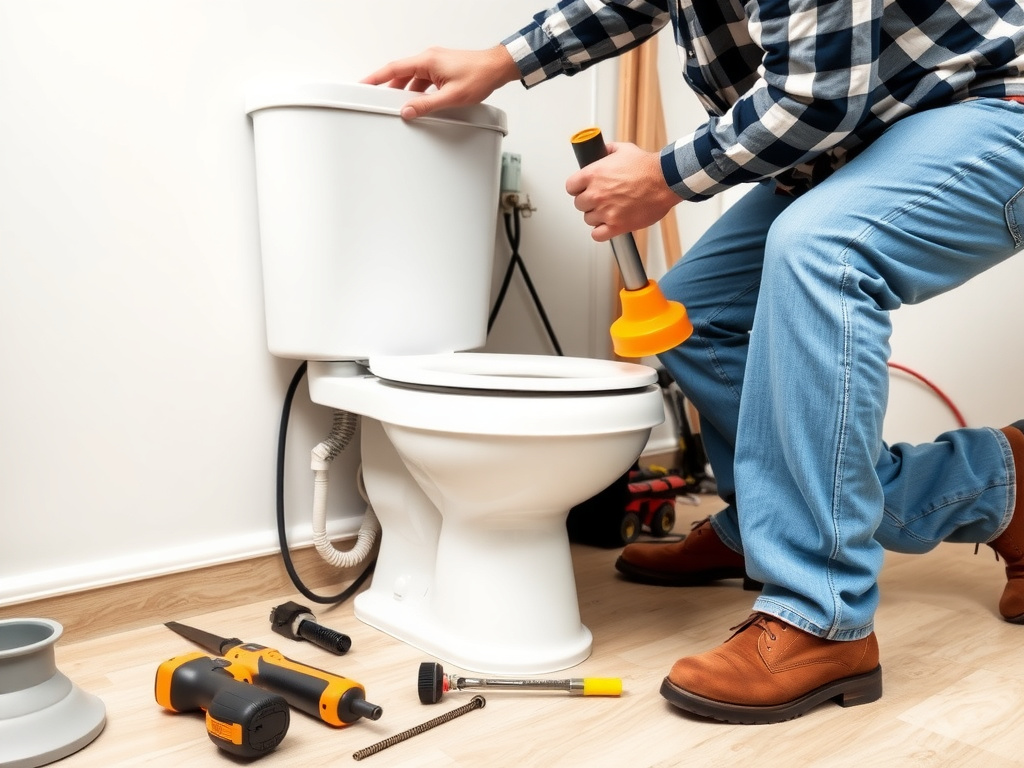
Tools and Materials Checklist
Forget the “basic hand tools” cop-out lists. Here’s what actually comes out of my van on every pan swap:
- ½” drive torque wrench, 5–25 Nm range (Sealey STW1012, £46 Amazon) – overtightening cracks ceramic.
- 115 mm angle grinder with diamond tile blade (DeWalt DCG405, £129) – trimming waste pipe flush.
- 6 mm carbide tile drill for pilot holes, 8 mm masonry bit for plugs.
- 300 mm spirit level with 0.5 mm/m vials—essential on uneven screeds.
- Colour-matched 100% silicone (Soudal Silirub 2P, anthracite £7.50) – stays flexible 25 years.
- 110 mm x 75 mm rubber reducer (Fern 21415, £4.40) – solves 99% soil-pipe mismatches.
- 8 mm pan-to-wall fixing bolts, brass not zinc—zinc swells and snaps.
- 5 kg tub of tile spacers (£3.50) – doubles as packers for wobbly pans.
I once watched a homeowner drive 8 mm coach screws straight through the foot of a £320 Roca pan because “they looked stronger.” The ceramic sheared at 11 pm on a Sunday; merchant shut, family of five, one loo. Use the right bolts—save the drama.
Measuring and Marking Accurately
Soil pipe centre lines rarely align with tile joints; trust the pipe, not the grout. Run a laser level (Bosch Quigo £45) across the wall at 300 mm height, then drop a plumb bob from the pipe centre to the floor. Mark that spot with a Sharpie—pencil rubs off when you dry-fit. Now measure forward to the front rim of your chosen pan; allow 50 mm clearance for your toes if the door swings inward. I scribble the outline on the floor with masking tape; clients can “test sit” before anything permanent happens. Sounds odd, but I’ve avoided three returns because 6 ft 4 sons couldn’t fit their knees.
Check left-to-right too. A 370 mm wide pan may look central, but add 30 mm for the cistern lever and you foul a heated-towel rail. I photograph the taped outline, then WhatsApp the image to the customer with the caption “sign here.” CYA at its finest.
Removing the Old Pan Without Flood Damage
First, shut off the isolating valve—usually a 15 mm compression mini-valve on the left. Open the cistern and flush until empty, then sponge the dregs into a bucket. Unscrew the pan connector; if it’s original 1980s black rubber, it’s probably glued solid with scale. Slice it carefully with a Stanley knife, guiding away from the soil pipe to avoid scoring plastic. Rock the pan sideways to break the wax seal; if it’s concrete-solid, run a hairdryer round the spigot for two minutes—wax softens at 40 °C and the pan lifts clean.
Have an old towel ready in the soil pipe; it blocks sewer gas and catches the last 200 ml of water trapped in the bend. I forgot once in 2018; the brown geyser hit the ceiling and cost me a £120 decorator bill. Lesson learned.
Installing the Soil Pipe Connector
Modern pan connectors come in three flavours: straight, 5° finned, and 90° bent. Finned versions accept 110 mm pipe but seal on the fins—great for retrofit. Smear the soil pipe with silicone, not grease; grease migrates and loosens over time. Push until the first fin disappears, then twist 45° to seat the remaining fins. You should feel a definite stop; if the connector keeps sliding, the pipe is out-of-round—sand the high spots with 80-grit wrapped round a paint tin.
Measure the protrusion inside the pan spigot; anything over 10 mm restricts flow and causes “double flush syndrome.” Trim with a sharp knife, chamfer the edge 30°—same technique electricians use on 20 mm conduit. Wipe swarf away; one grain trapped between rubber and porcelain weeps for weeks.
Positioning and Levelling the Pan
Bed the pan on six pea-sized silicone dots, not a full bead—full beads squeeze upward and glue the pan to the floor forever. Lower straight down, spigot first, then rock gently until the foot print matches your taped outline. Check level front-to-back and side-to-side; most pans tolerate 2 mm fall to the soil pipe, but any more puddles the bowl. Slip 2–4 mm tile spacers under the feet as temporary shims; silicone cures in 30 minutes, then kick them out.
Drill pilot holes through the ceramic foot with a 6 mm tile bit at 400 rpm—no hammer. Switch to masonry, drive 8 mm brown plugs flush, then fit brass screws. Torque to 5 Nm; that’s finger-tight plus ¼ turn with a 10 mm spanner. I use a T-bar so clients can see I’m not reefing on it. Over-torque and you’ll hear the dreaded “tick” of micro-fracture—game over.
Connecting Water and Testing
Hand-tighten the 15 mm copper or PEX to the cistern inlet, then nip ⅛ turn with pump pliers. Modern pans ship with a plastic backnut—overtightening cracks the shank. Open the isolator slowly; let the float rise and shut off. Listen. A faint hiss means the washer isn’t seating; undo one flat and re-tighten. Once silent, flush three times and watch the pan connector for weeps. I slide a square of toilet paper round the joint—if it stays dry for 60 seconds, you’re golden.
Check rim wash pattern; poor coverage usually means the cistern spout isn’t centred. Loosen the two wingnuts inside, rotate 5 mm, retighten. Final step: run a bead of silicone round the base, leaving a 100 mm gap at the back—if a leak ever develops, water can escape visibly rather than rotting the floor.
Wall-Hung and Back-to-Wall Variations
Wall-hung frames anchor to blockwork, not plasterboard. Use M10 thunderbolts at 400 mm centres minimum; Geberit’s manual says 200 mm, but I’ve seen frames pull out when kids swing on the rim. Set the horizontal rail 1080 mm above finished floor for a 400 mm high pan—formula is: rim height minus pan height minus 20 mm tile allowance. Torque the hanger bolts to 20 Nm; any less and the pan wobbles, any more and you strip the thread.
Back-to-wall furniture needs a 300 mm service void. Run the soil pipe through the side, not the back, so you can remove the pan without dismantling the unit. McAlpine’s MACFIT straight connector with captive nut (Screwfix £11) lets you undo the pan from inside the furniture—lifesaver at 2 am when a tenant rings about a leak.
Common Mistakes and How to Avoid Them
1. Wrong wax orientation—the plastic funnel faces the soil pipe, not the pan. Reverse it and every flush sprays under the floor.
2. Siliconing before leak test—always test first; cutting out fresh silicone scars porcelain.
3. Using PTFE on pan connectors—rubber seals by compression, not thread; PTFE swells and pushes the seal off.
4. Ignoring pan projection—a 550 mm pan in a 560 mm recess blocks the door from opening over the rim.
5. Mixing cistern and pan brands—the 6 mm difference in spigot height leaves a 3 mm gap that whistles when you flush.
I once had to chisel up a £1,200 porcelain tile floor because the installer ignored point 4. The door trim acted like a lever; every close rocked the pan and cracked the wax. Insurance paid £2,800—still cheaper than a lawsuit, but the fitter’s reputation didn’t recover.
Safety Considerations and Legal Requirements
UK Building Regulations Part H1 (drainage) demands that any new soil connection is accessible for rodding. If you relocate the pan more than 600 mm from the main stack, fit a 110 mm access cap at the pan branch. Water Regulations Schedule 2.7 limits flush volume to 6 litres single or 4/2.6 dual; swapping an old 9 litre cistern for a new 4/2.6 is encouraged, but you must install a compliant siphon or valve. Waste pipes must fall 18–90 mm per metre; shallower risks blockage, steeper syphonage.
Warning: Drilling into a soil pipe that shares a stack with upstairs flats can pressurise sewer gas and force methane through neighbour’s traps—verify ventilation by checking stack termination above eaves before you cut.
If you smell gas (not sewer), stop immediately and call the Gas Safe engineer; I’ve seen a spark from an angle grinder ignite residual LPG from a redundant supply. Electrically, any lighting circuit within Zone 1 needs IP44 minimum; most retrofits don’t touch electrics, but if you add a mirror demister, notify Building Control or use a registered electrician.

How long does a standard close-coupled install take?
A straight swap on a sound existing soil pipe takes 90 minutes if nothing breaks. Add 30 minutes for tile drilling, 45 minutes if the soil pipe needs trimming. Wall-hung frames eat half a day because you’re building studwork and waiting for silicone to cure before loading the frame.
Can I reuse the existing pan connector?
Only if it’s the finned rubber type and under five years old. Hard PVC solvent-welded connectors become brittle; the slight movement of a new pan shears the glue line. A new connector is £4—cheaper than a callback.
Why does my new pan wobble even after tightening?
Either the floor isn’t flat or the pan foot is hollow. Slip stainless washers under the low side, or inject low-expansion foam into the foot void (Hilti FS-One, £14). Never use cardboard; it compresses and smells when wet.
Is silicone or plumbers’ mastic better around the base?
Silicone every time. Mastic skins in 24 h and traps moisture underneath, leading to smelly black mould. Use sanitary silicone with fungicide; it stays elastic 25 years and peels off cleanly when the next installer appears.
What if my soil pipe is cast iron?
Use a spigot-mounted rubber adaptor (Fern 21415) but tighten the jubilee clip to 3 Nm only—cast iron is brittle. Wrap the joint with Denso tape before backfilling to stop electrolytic corrosion between steel clamp and iron.
Do I need Building Control approval?
Swap for swap, no. If you move the pan more than 600 mm or add a macerator, yes—submit a Building Notice (£250 most councils). Keep the completion certificate; buyers’ solicitors ask for it on every sale.
Final Checklist and Commissioning
Run a full 6 litre flush and time the refill—should be 55–65 seconds at 3 bar. Drop three sheets of paper in the bowl; they should vanish in one flush. Inspect the base with a £5 endoscope camera; any silicone squeeze-out indicates full contact. Photograph the serial number and installation date inside the cistern lid—future you (or me) will thank you when sourcing spare parts. Hand the customer the silicone tube with the batch number; if it ever discolours, the manufacturer pays for redecoration.
You now have the same checklist I carry in my van. Follow it, and the only thing left is to peel the protective film and enjoy the quiet whoosh of a job that’ll outlast the tiles.