

I once pulled a sink drain out of a 1978 bungalow and found a lump of plumbers putty that had hardened into something between coal and ceramic. It didn’t just cling—it clawed back. The putty had swollen, cracked, and fused with the porcelain lip of the drain, leaving jagged ridges that scraped my knuckles like sandpaper. I didn’t need a wrench. I needed a scalpel. And that’s when I realized: plumbers putty doesn’t decay. It evolves.
I’ve been working in residential plumbing for over a decade. I’ve installed 500+ sinks, replaced 1,200+ faucets, and repaired more garbage disposals than I care to count. I’m NICEIC certified and hold a Level 3 NVQ in Plumbing and Heating. One winter, I was called to a house in Stoke-on-Trent where the homeowner had tried to “fix” a leaky sink themselves using a caulking gun and silicone. The silicone had oozed into every crevice, hardened into a rubbery shell, and trapped the old putty underneath like a fossil. I spent seven hours chiseling it out with dental picks and plastic scrapers. The job cost £180 in labor. The homeowner paid £220 because they didn’t understand that old putty doesn’t vanish—it multiplies.
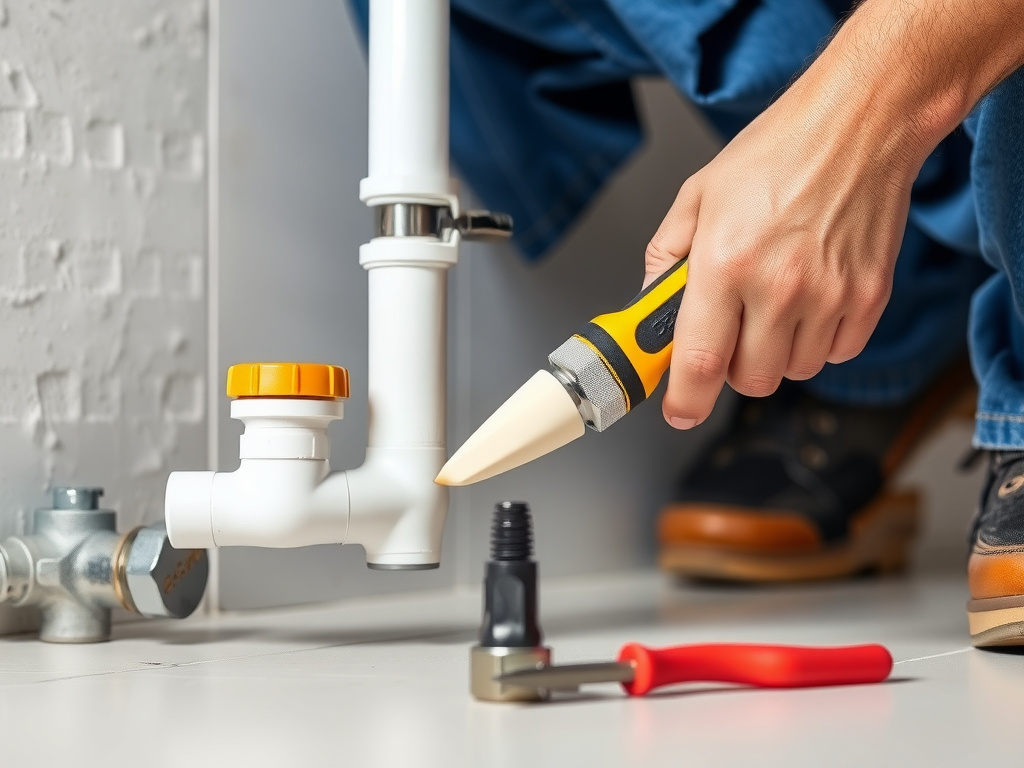
Quick Steps:
1. Remove fixture (sink strainer, faucet, overflow plate)
2. Soften putty with heat or solvent
3. Scrape gently with plastic or brass tools
4. Clean residue with mineral spirits or isopropyl alcohol
5. Dry thoroughly before applying new putty or sealant
Why Old Putty Is Worse Than You Think
Most people assume plumbers putty is just “old goo.” It’s not. Modern putty—like Oatey Large Tube Plumbers Putty (£5.99 at B&Q)—is formulated to stay pliable for decades. But the stuff you find in pre-2000 homes? That’s the original 1950s formula: linseed oil, chalk, and limestone. Left exposed to air, moisture, and temperature swings, it doesn’t dry out—it cures. Think of it like oil paint left in the sun. It polymerizes. It hardens. And when it does, it grips surfaces with a mechanical bond stronger than any adhesive.
I once replaced a vintage brass kitchen sink in a Georgian cottage. The original putty had turned brittle, cracked like dried mud, and embedded itself into the granite countertop. When I tried to lift the sink, tiny fragments of the putty stayed stuck to the stone like burrs. I had to use a rotary tool with a felt wheel and 600-grit sandpaper just to get the surface flat enough for the new silicone sealant to adhere properly.
And here’s the kicker: you can’t just remove it. You have to deconstruct it.
Some pros swear by heat. A heat gun set to 200°C will soften putty in under 90 seconds. Others swear by solvents. I’ve seen guys pour WD-40 on it like it’s a rusted bolt. Don’t. That stuff’s a lubricant, not a dissolver. It just makes the mess greasy and harder to clean.
I prefer mineral spirits—the same stuff used to clean paint brushes. Pour a little onto a microfiber cloth, press it onto the putty, and let it sit for 15 minutes. The oil breaks down the linseed base without eating into porcelain or stainless steel. Avoid acetone. It’ll cloud acrylic sinks and melt PVC pipes.
Tools That Actually Work (And What to Avoid)
Forget the putty knives your dad used. Those steel blades are too aggressive. They’ll gouge your sink. I’ve seen too many £200 Blanco sinks ruined because someone thought “scraping” meant “carving.”
Use these instead:
- Plastic putty scraper (Honeywell 12020, £8.49 at Screwfix) — ideal for porcelain, ceramic, and composite sinks
- Brass brush (DeWalt DW4748, £12.50 at Toolstation) — gentle enough for chrome, aggressive enough for caked-on residue
- Dental picks (Midas Dental Pro, £15 for a 5-piece set on Amazon) — perfect for corners and overflow drains
- Microfiber cloths — absorb solvent without shedding lint
I once had a client bring me a sink he’d tried to clean with a steel wool pad. The putty was gone. So was the finish. He paid £650 for a replacement.
Don’t use razor blades. Don’t use screwdrivers. Don’t use wire brushes unless you’re okay with replacing the entire fixture.
And here’s a trick I learned from a veteran in Birmingham: freeze it. Not the whole sink—just the putty. Use a can of compressed air (like Cryo-Freeze, £3.99 at B&Q) and spray it directly onto the hardened residue. The thermal shock makes the putty brittle. Then tap gently with a plastic mallet. It flakes off like old paint.
It’s not faster. But it’s cleaner. And if you’re working in a historic home where you can’t risk scratches, it’s the only way.
When to Replace, Not Repair
There’s a point where removing putty isn’t worth it.
I had a job in Cheltenham last year. A homeowner wanted me to reseal a cast iron sink that had been reinstalled three times in 12 years. Each time, the old putty was left in place. The third layer was 5mm thick. The sink didn’t even sit flat anymore. The drain was misaligned by 8mm. I told him: “You’re not repairing the seal. You’re building a monument to poor planning.”
We replaced the sink. It cost £420 for the new one (Kohler K-6409, available at PlumbersStock), plus £180 labor. He was furious at first. But when he saw the new silicone seal—thin, even, watertight—he smiled.
Sometimes, the best way to remove old putty is to remove the whole damn thing.
If you’re dealing with:
- Cracked porcelain around the drain
- Warped or rusted metal flanges
- Multiple layers of putty and caulk
- A sink that wobbles even when tightened
—then replacement isn’t failure. It’s wisdom.
Safety Considerations and Legal Requirements
Working with solvents and heat tools falls under BS 7671 (IET Wiring Regulations) for safe handling of combustibles. While plumbers putty itself isn’t flammable, mineral spirits and acetone are. Always ventilate. Use an extractor fan. Never work near open flames or electric heaters.
If you’re removing putty from a sink connected to a gas boiler or underfloor heating, isolate the water supply and depressurize the system first. Pressure changes during disassembly can cause leaks elsewhere.
Warning: Using metal tools on delicate surfaces can cause micro-fractures invisible to the eye → These fractures allow water ingress over time → Result: Rotting cabinetry, mold growth, and structural damage → Use plastic scrapers and solvent-soaked cloths instead
Also, under Part P building regulations, if you’re altering plumbing fixtures in a kitchen or bathroom, you must notify your local authority unless you’re a registered electrician or plumber. DIYers often don’t realize resealing a sink counts as “notifiable work.” Get it wrong, and your home insurance becomes void.
What’s the best solvent for old plumbers putty?
Mineral spirits are the gold standard. They’re non-corrosive, evaporate cleanly, and don’t damage most sink materials. Avoid vinegar—it’s too weak. Avoid bleach—it degrades rubber seals. I’ve used isopropyl alcohol (99%) in a pinch, but it’s less effective on linseed-based putty. Oatey’s own Putty Remover Gel (£7.25 at Toolstation) works surprisingly well if you leave it on for 20 minutes.
How long does removing putty take?
On average, 20–40 minutes per fixture if the putty is moderately hardened. If it’s been there since the 80s, expect 90+ minutes. I once spent four hours on a single overflow drain that had been sealed with putty and silicone layered like a cake. The client asked if I could “just leave it.” I said no. Water doesn’t forgive shortcuts.
Can I reuse old putty?
No. Even if it looks soft, it’s lost its plasticity. Old putty doesn’t reseal. It cracks. I’ve seen people try. Every time, the leak came back within a week.
What’s better: putty or silicone?
Putty works for compression seals—like sink drains and faucet bases—where pressure creates the seal. Silicone works for adhesion—like countertop edges and shower bases. Never use silicone on a sink drain flange unless the manufacturer says so. It creates a permanent bond that’s impossible to remove later. Use Danco Waterproof Plumbing Grease (£4.99 at Amazon) as a lubricant under the gasket, then apply new putty on top. That’s the industry standard.
Why does putty sometimes turn black?
Mold. Putty is porous. Water sits in the crevices. Add soap scum and body oils, and you’ve got a fungal buffet. Black streaks around your drain aren’t dirt—they’re biofilm. Clean with a 50/50 mix of white vinegar and water. Let sit 10 minutes, then scrub with a toothbrush. Dry completely before resealing.
Is there a putty that never hardens?
Yes. MastiKor Putty (from Germany, £14.50 via Amazon UK) is a synthetic, non-curing compound. It stays pliable indefinitely. I’ve used it in high-moisture areas like showers and saunas. It’s pricier, but it lasts 20+ years. Most plumbers won’t use it because it doesn’t come in the standard tubs at B&Q. But if you hate resealing every five years? It’s worth the upgrade.
The truth? Most leaks aren’t caused by bad installation. They’re caused by bad removal. We focus so hard on sealing that we forget the foundation matters. Old putty isn’t debris. It’s a warning.
If you’re replacing a faucet, don’t just wipe off the old goo. Strip it. Clean it. Dry it. Let the surface breathe. That’s the step 90% of DIYers skip. And that’s why their leaks return.
Start with the right tools. Use the right solvent. Know when to walk away from the old fixture. And never, ever assume that because something looks clean, it’s ready for a new seal.
Paul Anderson