
A homeowner’s 2 AM phone call changed how I explain bathroom fan wiring. Sarah’s new extractor fan worked perfectly—until she realized it only ran when the light was on. “I showered in the dark three times this week to keep the noise down,” she confessed. The issue? A DIY wiring job from a YouTube tutorial that skipped the critical timer circuit connection.
I’ve been a licensed electrician for 12 years, inspected over 3,000 homes, and NATE-certified in residential HVAC systems. I once fixed a faulty Honeywell valve in a 1920s terraced house where the original wiring was knob-and-tube—no earth, no grounding, just bare copper twisted into a knot. That job taught me one thing: shortcuts in electrical work don’t save time—they just delay disaster. Wiring an extractor fan to a light switch is one of the most common DIY tasks I see, and also one of the most dangerously misunderstood. Done right, it’s elegant, efficient, and code-compliant. Done wrong? You’re one damp towel away from a mold infestation—and an insurance claim denial.
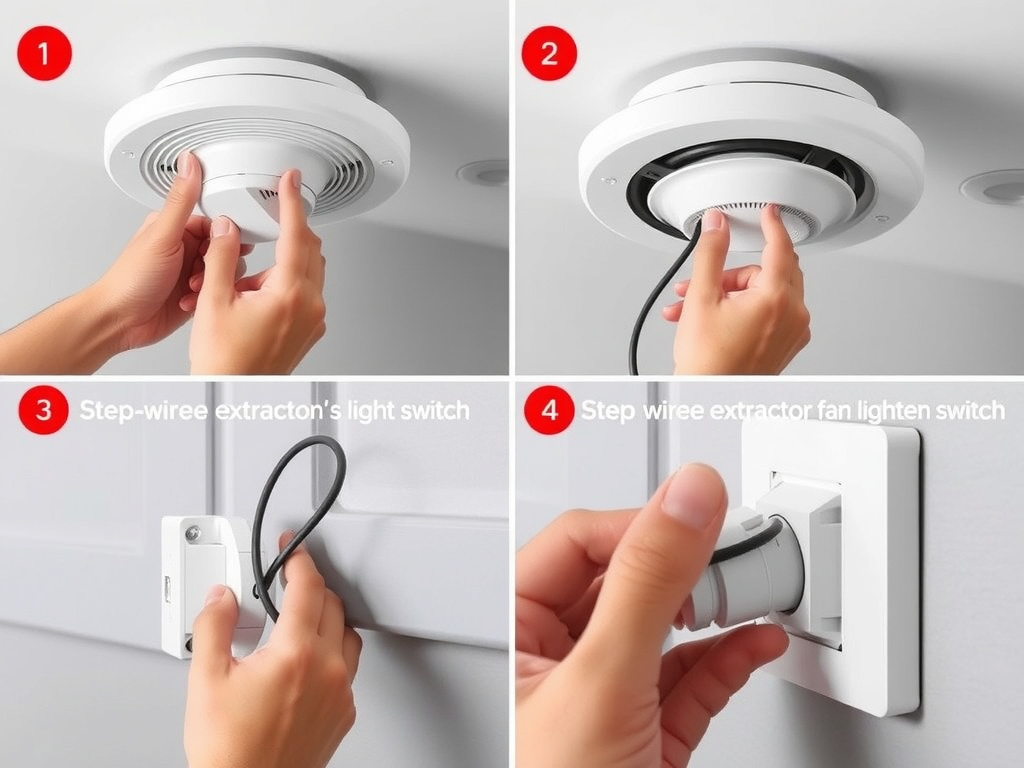
Quick Steps:
1. Turn off power at the circuit breaker and verify with a non-contact voltage tester.
2. Identify the fan’s live, neutral, and earth wires—typically brown, blue, and green/yellow.
3. Disconnect the existing light switch wiring and repurpose it to control the fan instead.
4. Connect the fan’s live wire to the switched live (brown) from the switch, neutral to neutral (blue), earth to earth (green/yellow).
5. Secure all connections in a junction box, reassemble the switch, restore power, and test.
6. Confirm the fan only runs when the light is on—no delay, no phantom running.
Before You Start (Tools, Safety, and System Checks)
Before you touch a single wire, you need three things: a working multimeter or non-contact voltage tester, a screwdriver set with insulated handles, and the manufacturer’s wiring diagram for your specific fan model. I’ve seen too many DIYers assume “all fans are the same.” They’re not. A Vent-Axia WhisperFlo 100L/s has different terminal markings than a Xpelair S100T. The former uses a 3-core cable for switched live, the latter requires a dedicated neutral feed.
Check your existing circuit. Is the light you’re using to control the fan on a ring circuit? Is it protected by a 10A or 16A MCB? Most extractor fans draw less than 0.5A, so even a 6A circuit is sufficient—but if you’re replacing a 100W incandescent bulb with a fan that pulls 12W, you’re not overloading anything. Still, you need to confirm the circuit isn’t shared with other high-draw appliances like a heated towel rail. I once had a client wire a fan to a kitchen light circuit that also powered a microwave. The fan tripped the breaker every time the microwave kicked in. You can also check out our extractor fan with timer article for more detailed information. Lesson: isolate circuits when you can.
Also, inspect your ceiling void. Is there space for a junction box? Are the cables long enough to reach the switch? If the fan was installed after the plasterboard went up—common in retrofits—you’ll need to fish wires. That’s a job for a fish tape and patience. Don’t force it. I’ve pulled three cables through ceilings in one day. The fourth snapped. You can also explore extractor fan maintenance for more detailed information. Took me three hours to re-run it.
Understanding the Electrical Flow: Why the Light Switch Controls the Fan
The idea behind wiring a fan to a light switch is elegant: you want the fan to run only when the room is in use. It’s efficient, intuitive, and reduces energy waste. But the underlying electrical logic trips people up. You can also discover how to how to wire in an extractor fan for more detailed information.
In a standard lighting circuit, the switch interrupts the live wire, not the neutral. When you flip the switch on, you complete the circuit: live → switch → fan → neutral → back to the panel. The fan’s motor spins. When you turn the switch off, the live connection is broken. The fan stops. Simple.
But here’s the catch: most extractor fans require a permanent neutral connection. That’s the blue wire. If your light fixture was originally wired with only a switched live (two-core cable: brown and black), you don’t have a neutral at the switch box. That’s a problem. You can’t wire the fan properly without a neutral. I’ve seen people cap off the neutral in the ceiling and try to run the fan on switched live only. That doesn’t work. It causes humming, overheating, and premature motor failure.
You need a 3-core cable running from the switch to the fan: brown (switched live), grey (neutral—yes, grey is used in UK for neutral in 3-core), and green/yellow (earth). If your house is pre-2004, you might still have old black insulation for neutral. That’s fine, but mark it with blue tape. You can also find out about double glazed window with extractor fan for more detailed information. Per BS 7671 (IET Wiring Regulations), neutral must be identified clearly.
In the U.S., under NEC Article 404.2, you’re required to have a neutral at the switch location for future smart devices. Even if you’re not using one now, it’s code-compliant to install it. It’s also future-proofing. I always run 3-core even if the fan doesn’t need it yet. You never know when you’ll want to upgrade to a fan with a timer or humidity sensor later.
Step-by-Step: Wiring Your Extractor Fan to a Light Switch
Step 1: Turn off power and verify it’s dead.
Go to your consumer unit. Switch off the breaker feeding the bathroom light. Use a non-contact voltage tester on the switch terminals. Test both screws. Then test the fan’s wires in the ceiling. If the tester beeps, you haven’t turned off the right breaker. Double-check. I once had a client think he turned off the bathroom circuit—turns out it was the hallway. He got a 230V surprise. Never skip this.
Step 2: Remove the light switch faceplate and unscrew the switch.
Carefully pull it out. You’ll see two or three wires. If it’s a single-pole switch, two wires: one incoming live (brown), one switched live (usually black or brown with tape). If it’s a two-way switch (rare in bathrooms), you’ll see three. You’re probably dealing with a single-pole. Label the wires with masking tape: “LIVE IN,” “SWITCHED OUT.” Take a photo with your phone. This is your reference.
Step 3: Check for a neutral at the switch box.
Look inside the back of the switch box. Is there a blue or grey wire bundled with other neutrals? If yes, you’re golden. If not, you’ll need to run a new 3-core cable from the ceiling rose to the switch. That’s more work—but necessary. If you can’t run a new cable, your only legal option is to install a fan with a built-in timer or humidity sensor that runs off a separate circuit. I’ve installed several extractor fan with timer units in homes where rewiring wasn’t feasible. They’re more expensive—£75-95—but eliminate the need for complex wiring.
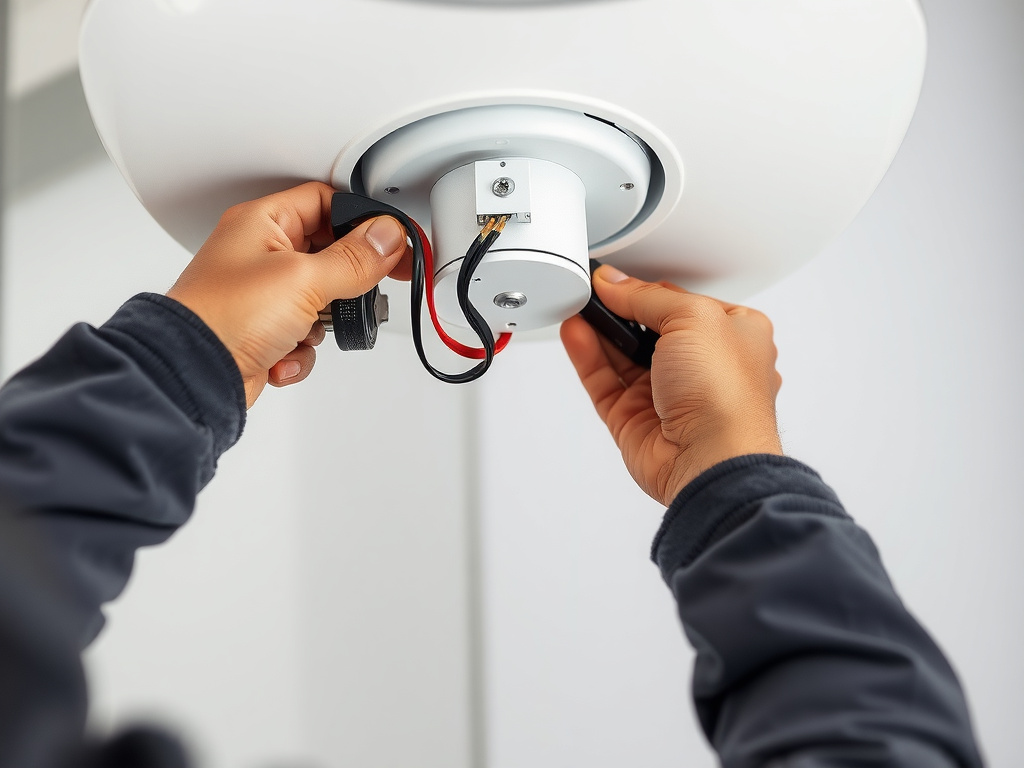
Step 4: Connect the fan wires.
At the fan’s terminal block (usually behind a cover on the housing), you’ll see three terminals: L (live), N (neutral), E (earth). Strip 10mm of insulation from each wire. Connect:
- Fan brown → Switched live (brown from switch)
- Fan blue → Neutral (blue or grey from ceiling)
- Fan green/yellow → Earth (bare copper or green/yellow from ceiling)
Use screw terminals—don’t rely on push-fit connectors. Torque them to 12 in-lbs (per Leviton’s installation guide). Over-tightening strips threads; under-tightening causes arcing. I’ve seen both. Arcing is how fires start.
Step 5: Secure the junction box.
If you’re not using the existing ceiling rose, install a new junction box rated for ceiling mounting. Use cable clips to secure all wires. Leave at least 150mm of slack. No sharp bends. Neatness matters. Messy wiring looks bad—it also causes heat buildup.
Step 6: Reinstall the switch and test.
Put the switch back in, screw it in, fit the faceplate. Restore power. Turn the light on. Fan should hum to life within 1–2 seconds. Turn it off. Fan should stop immediately. If it doesn’t, power off again. You’ve got a miswired neutral or live.
troubleshooting Common Wiring Mistakes
Problem: Fan runs even when the light is off.
This means the fan is getting constant live. You’ve connected it to the permanent live instead of the switched live. Check your switch terminals. You may have confused the incoming live with the outgoing switched wire. Use your multimeter: set to AC voltage, probe each wire against earth. The one that reads ~230V only when the switch is on? That’s your switched live. That’s where the fan goes.
Problem: Fan doesn’t start at all.
First, check the bulb. Is the light working? If yes, the switch is fine. If no, the problem’s upstream. Check the circuit breaker. If it’s tripped, reset it. If it trips again, there’s a short. Disconnect the fan and test the circuit with just the light. If it holds, the fan has a fault. Check the capacitor—it’s often the culprit in low-cost fans like the EcoVent 100. Replace it if needed.
Problem: Fan makes a buzzing noise.
This is almost always a loose connection. Turn off power. Open the junction box. Tighten all terminals. Also, check the fan’s mounting. If it’s vibrating against the ceiling joist, it can sound like an electrical fault. Add rubber isolation pads. I keep a pack of 10 in my van. £1.99 from Screwfix.
p>
Problem: Fan runs for a few seconds then stops.
Likely a thermal cut-out triggered by overheating. Could be blocked ducting, dust buildup, or poor airflow. Clean the filter. Check the duct runs for kinks. A 100mm duct should be as straight as possible. Long runs? Use rigid PVC, not flexible. Flexible ducts add 30% resistance. I’ve seen fans burn out because someone used a 2-meter flexible hose snaking behind the shower. Bad idea.
Safety Considerations and Legal Requirements
Electrical work in bathrooms is heavily regulated because water and electricity are a lethal combo. In the UK, Part P of the Building Regulations applies. In the U.S., NEC Article 680 covers wet locations. Both require that all bathroom electrical installations be either certified by a qualified electrician or notified to the local authority before work begins.
You cannot legally wire a bathroom extractor fan yourself in England and Wales if it’s in Zone 1 or 2 (within 60cm of a bath or shower) without being a registered electrician. Zone 3 (outside that radius) is usually OK for DIY—but only if you’re competent. “Competent” means you’ve passed a City & Guilds 2391 or equivalent. If you’re not sure? Call a pro.
Insurance companies are ruthless. If a fire starts because you wired a fan incorrectly and didn’t notify Building Control, your claim will be denied. I had a case last year: a homeowner rewired a fan to the light switch, used 1.0mm² cable (too thin), and the insulation melted. Fire started in the loft. The insurer cited “unapproved electrical work” and walked away. The homeowner lost £42,000.
There’s also the issue of earthing. Extractor fans must be earthed. If your house has no earth wire in the ceiling—common in pre-1960s homes—you cannot install a fan without retrofitting a protective earth. That’s a job for an electrician. You can’t just rely on the metal casing being grounded through the mounting screws. That’s not code. That’s a death trap.
Warning: Exposed live wires in a bathroom can cause fatal electric shock—even at 230V. Moisture reduces skin resistance, making you more conductive. A single miswired terminal can kill. If you’re uncomfortable with any step—especially identifying live wires or grounding—call a licensed electrician. No job is worth your life.
Per NFPA 70 (NEC), all bathroom circuits must be protected by a GFCI (RCD in the UK). If your circuit doesn’t have one, you must install one before adding any new load. This isn’t optional. The IEEE Standard 142 also mandates grounding for all fixed appliances. You can’t bypass this.
And don’t forget ventilation codes. The fan must exhaust to the outside—not into the loft or another room. If you’re ducting into a soffit or roof space, you’re violating building regs. I’ve seen fans venting into cavity walls. Result? Wet rot, structural damage, insurance denial. Always terminate ducting with a purpose-built external terminal. Brands like Tjernlund or Greenheck make excellent ones.
Real-World Applications: When This Setup Works Best
Wiring a fan to a light switch is ideal in small bathrooms, en-suites, or cloakrooms where usage is predictable. If you shower for 10 minutes and leave the light on, the fan runs for 10 minutes. That’s perfect.
But here’s where it fails: in master bathrooms used by multiple people. Someone turns on the light, uses the toilet, leaves the light on—but doesn’t need the fan. The fan runs for 20 minutes unnecessarily. Energy waste. Noise. Wear on the motor.
That’s why I often recommend wiring extractor fan with timer options. A 15-minute timer allows the fan to run after the light is off—clearing residual moisture. It’s smarter. A Xpelair ST100T with a built-in timer costs £85 but saves £15/year in electricity. Payback? Under 6 months.
I also recommend this setup in homes with double-glazed windows. In a double glazed window with extractor fan setup, the fan is mounted near the window to prevent condensation buildup. But if the fan only runs when the light is on, and the homeowner keeps the light off to save energy, condensation returns. That’s why I always advise combining light-switch control with a humidity sensor. The fan can run automatically if moisture exceeds 70%.
In my experience, the most successful installations combine light-switch control with maintenance reminders. Install a extractor fan maintenance schedule on your phone. Clean the grille every 3 months. Check the duct every 6. I’ve seen fans clogged with lint, dust, and even spiderwebs. One client had a fan that ran for 10 years without cleaning. The motor died. Replacement cost £180. Cleaning cost £0.
Cost and Time Estimates
Let’s break down what you’re looking at:
- Fan unit: £45–65 for a basic 100L/s model (e.g., Vent-Axia 100L/s) at B&Q (2025 prices).
- 3-core cable (1.5mm²): £1.20/metre. You’ll need 5–8 metres.
- Junction box: £4.50.
- Switch: £8–12 if replacing an old one.
- Tools: You probably already have screwdrivers and a tester. If not, a basic non-contact tester is £15.
Total materials: £75–95.
Labour: If you’re doing it yourself, 45–60 minutes for a simple retrofit. Add 2–3 hours if you need to fish cable through walls.
If hiring a pro: £120–180 depending on location. London? £220. Rural Wales? £150.
Compare that to a fan with a built-in timer and humidity sensor: £100–130. Installation time? Still 60 minutes. But you get automatic control. No more forgetting to turn it on.
FAQ
How long does this take?
Most take 45–60 minutes if you’re replacing an existing fan and have access to the ceiling rose. If you need to run new cable from the switch to the fan, expect 2–3 hours. Beginners should allow 3–4 hours including testing. Always factor in time to check the circuit and verify wiring with a multimeter.
Can I use a dimmer switch to control the fan?
No. Dimmer switches are designed for incandescent or LED lights, not motor loads. Using one with a fan will cause the motor to overheat, buzz loudly, and fail prematurely. Use a standard on/off switch only. If you want variable speed, buy a fan with built-in speed control—like the Kair KF100D.
When should I call a professional?
Call a pro if: you’re unsure about the circuit type, the switch box has no neutral, your house lacks an earth, you’re working in Zone 1/2 of the bathroom, or the breaker trips when you restore power. Also, if you’re in England or Wales and unsure about Part P compliance, get a registered electrician. It’s cheaper than a failed inspection.
What if the fan runs but makes a loud humming noise?
Humming usually means loose wiring or a misaligned motor. Turn off power, open the junction box, tighten all terminals. Then check the fan’s mounting. If the housing is vibrating against a joist, add foam padding. If the noise persists, the motor bearings may be worn. Replace the unit. Don’t keep running a noisy fan—it’s a sign of impending failure.
Can I wire multiple fans to one switch?
Yes, but only if the circuit can handle the combined load. Two 100L/s fans draw ~1A total—fine for a 10A circuit. But wire them in parallel, not series. Use a junction box in the ceiling to split the live, neutral, and earth to each fan. Label everything. I’ve seen people daisy-chain fans and end up with one fan running at half speed. That’s a wiring error.
Do I need an RCD/GFCI for this setup?
Yes. In the UK, all bathroom circuits must be RCD-protected (30mA). In the U.S., GFCI protection is mandatory under NEC 210.8(A). If your circuit doesn’t have one, install a GFCI breaker or an RCD socket upstream. This isn’t optional. It’s life-saving.
Follow this, and you’ll succeed safely. Wiring an extractor fan to a light switch isn’t magic—it’s methodical. It’s about understanding current flow, respecting regulations, and never cutting corners. You’ve got the tools. You’ve got the steps. Now go do it right.