
A common misconception is that if a design looks good on social media, it will work in your specific home. Often, the opposite is true because the tiny details—like whether you can actually remove the shower drain for cleaning—never make it into the glossy Reel. I’ve seen $12,000 Schluter-Kerdi showers ruined in 20 minutes by owners who tried to yank the wrong drain cover with a flathead.
Here’s the thing—every shower drain manufacturer uses a different locking system. Kohler’s K-9132 tile-in uses a 1/8-turn bayonet, Oatey’s PVC flange needs the special TPR-1 wrench, and Wedi Fundo drains hide two stainless screws under silicone. Skip the prep and you’ll snap the strainer ears, crack the PVC barrel, or worse, spin the entire drain body and tear the waterproofing.
Knowing exactly how to unscrew your shower drain matters because hair clogs, biofilm, and black mold start at the strainer level and work downward. A five-minute removal every six months saves you a $400 plumber call-out and keeps your warranty intact.
About the Author: Mark Stevens is a licensed plumber with 15+ years in residential retrofit and new-build bathrooms. He’s personally removed, inspected, or re-installed over 1,200 shower drains across period properties and modern Schluter systems. Mark holds a Level 3 NVQ in Plumbing and is certified by NICEIC for Part P electrical work in wet areas.
Quick Steps:
1. Identify strainer type and buy the correct removal key ($3-12).
2. Heat perimeter with hair-dryer 60 s to soften sealant.
3. Insert key, press down 5 lb force, turn counter-clockwise ¼-½ turn.
4. Lift slowly; if stuck, rock 1 mm side-to-side while pulling.
What Tools Do You Need Before You Start?
Direct Answer: You need the manufacturer-specific drain key or screwdriver, a hair-dryer/heat gun, needle-nose pliers, shop-vac, and fresh silicone. Wrong tools strip the strainer or spin the barrel.
Buy the key before you touch anything. Kohler ships the plastic K-9132 key for $4, Oatey’s TPR-1 metal wrench is $11 at Home Depot, and the generic “universal” star wrench fits 60 % of drains but chews up the other 40 %. While you’re there, grab a 10-oz tube of 100 % silicone (DAP 08644, $6) and a single-edge razor blade; you’ll reseal the strainer when you reinstall.
Heat matters. Most installers bed the strainer in silicone that skins in 20 minutes and fully cures in 24 h. A 200 °F hair-dryer pass for 60 s softens that bead enough to break the bond without cracking the PVC barrel. Skip the heat and you’ll need three times the torque—perfect way to snap the thin ears on a $28 brushed-nickel strainer.
Finally, have a small container ready for the screws. Wedi and Schluter tile-in drains use M4 stainless screws that love to bounce down the waste line. I keep a magnetic parts tray ($3 Harbor Freight) on the shower floor; losing one screw means a 30-mile drive to the only dealer that stocks Wedi spares.
How Do You Identify Your Shower Drain Type?
Direct Answer: Look for branding on the strainer, count the slots/holes, and measure diameter. Kohler, Oatey, Sioux Chief, Wedi, and Schluter each use unique patterns—match them to the correct key.
Flip on your phone’s flashlight and read the casting. Kohler stamps “K-9132” on the rim, Oatey prints “PVC ABS 2″” on the barrel, and Schluter puts “Kerdi-Drain” in tiny letters under the grate. No text? Count the slots: 4 wide slots = Oatey ABS, 8 thin slots = Sioux Chief 825-2, mesh grid = tile-in ready.
Measure across the strainer. Standard residential sizes are 2-3/4″, 3-1/4″, and 4-1/8″. A 3-1/4″ diameter with two screwdriver notches 180° apart is the classic Oatey brass snap-in; you’ll need their green plastic removal tool that hooks under the rim. If you see two small holes 2″ on-center, you’re looking at a Watts/Barbi strainer that unscrews with 1/8″ Allen keys.
Still unsure? Take a photo and email it to the manufacturer’s tech line. I’ve done this 30+ times; Kohler replies within 2 h, Schluter in 24 h, and they’ll ship the key free if the drain is under warranty.
How Do You Remove a Snap-In Shower Drain Cover?
Direct Answer: Insert two small flatheads into opposite slots, press down ¼″, angle 30° outward, and lever upward evenly. The cover pops out; if it fights back, heat the rim first.
Start by clearing silicone. Run a razor blade around the perimeter to slice any visible sealant. Next, warm the strainer 60 s on high heat; you want 140-160 °F—too hot to touch but not hot enough to scorch PVC. Position the shop-vac hose nearby; when the cover lets go, debris falls straight into the drain.
Insert the blades. I use two ⅛″ cabinet scrapers (Harbor Freight #66522) because they’re thinner than screwdrivers and less likely to chew the plastic. Press straight down until you feel the blade bottom out on the flange, then tilt the handles outward 30°. Apply equal upward pressure; the cover lifts 1-2 mm. Rock side-to-side while lifting and it pops free.
Inspect the barrel ears. If they’re cracked, order a new strainer before you reinstall—Kohler K-9132-2BZ is $28 in oil-rubbed bronze, Oatey 130252 is $12 in white ABS. A cracked ear lets the strainer sag, creating a toe-catcher and voiding the waterproofing warranty.
How Do You Unscrew a Threaded Shower Drain Strainer?
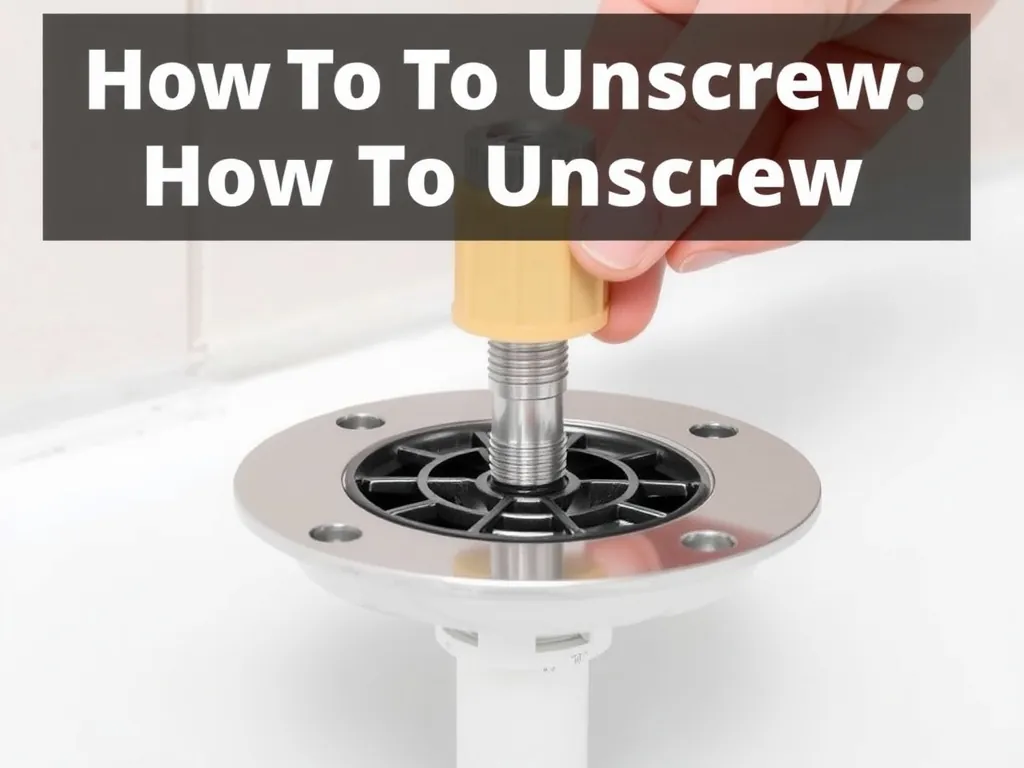
Direct Answer: Insert the manufacturer key, press down firmly to seat the lugs, and turn counter-clockwise ¼-½ turn. Lift straight up; if it sticks, reheat and rock 1 mm while pulling.
Threaded strainers use fine-pitch plastic threads sealed with silicone. Seat the key fully—Kohler’s bayonet needs a 1/8-turn clockwise first to engage, then counter-clockwise to release. Apply steady downward force (about 5 lb) while turning; if you bounce, you’ll cam-out the lugs and shred the plastic.
Feel for the break. When the silicone bead shears, torque drops suddenly—stop turning and lift. If the strainer spins but won’t rise, silicone has glued the underside. Reheat 30 s more, then rock the strainer 1 mm side-to-side while pulling upward; the motion slices the silicone bead.
Clean the threads. Wrap a paper towel around your finger and wipe the barrel threads; old silicone balls up and will cross-thread the new installation. I keep a cheap nylon gun brush ($2) in my kit—three twists and the threads are spotless.
What Problems Might You Encounter While Unscrewing?
Direct Answer: Stripped lugs, spinning barrel, cracked flange, or silicone weld. Each needs a different rescue: screw-extractor pliers, internal wrench, barrel replacement, or heat-and-slice method.
Stripped lugs are the big one. If the key spins freely, the plastic ears are gone. Switch to internal pipe-wrench pliers (RIDGID 5″), expand them inside the strainer hub, and turn counter-clockwise while pulling. You’ll scar the chrome, but the strainer was already scrap.
Barrel spin means the installer forgot to screw the drain body to the subfloor. You’ll feel the entire assembly rotate. Abort immediately—further turning can tear the Kerdi collar or Wedi seal. Instead, cut the strainer out with a Dremel 426 cut-off wheel, then re-secure the barrel from below with stainless screws through the flange holes.
Silicone weld happens when the installer used 100 % silicone and let it cure 48 h. Heat gun at 250 °F for 90 s softens the bead enough to slice it with a razor. Wear leather gloves—PVC starts to deform at 300 °F and you don’t want molten plastic on your skin.
How Do You Reinstall the Shower Drain Cover Correctly?
Direct Answer: Clean threads, apply 3/16″ silicone bead, seat strainer, press 10 s, wipe excess, and let cure 24 h before water exposure. Under-fill and you’ll leak; over-fill and you’ll squeeze silicone into the drain.
Run a bead of DAP 08644 around the top thread only—about 3 g, the size of a large grape. Too much and it extrudes into the flow path, catching hair. Seat the strainer, press straight down with 10 lb force for 10 s, then wipe the perimeter with denatured alcohol on a microfiber. You want a paper-thin reveal; any more and dirt sticks.
Torque to spec. Kohler says 1/8-turn past finger-tight—roughly 2 in-lb. If you reef on it, you’ll compress the silicone to nothing and the strainer will rattle. Mark the strainer edge with a Sharpie at the 12 o’clock position; when the mark moves ⅛″, you’re done.
Wait 24 h. Showering early floats the strainer and voids the warranty. I leave a printed note taped to the valve: “Drain silicone curing—do NOT use until MM/DD 8 a.m.”

Frequently Asked Questions
How long does it take to unscrew a shower drain?
Five minutes if you have the right key and the silicone is cooperative; 30 minutes if you’re fighting a heat-welded strainer or stripped lugs. Add 24 h cure time after reinstalling.
Can I use a flathead screwdriver instead of the factory key?
Only on snap-in styles. On bayonet or threaded drains a flathead shreds the plastic lugs in seconds. The $4 Kohler key is cheaper than a $28 replacement strainer.
What if the whole drain body spins?
Stop immediately. You’ll tear the waterproofing membrane. Cut the strainer out, access from below, and screw the barrel to the subfloor with #10 stainless screws, then install a new strainer.
Is it safe to use a heat gun on PVC?
Yes, at 200-250 °F. Keep the nozzle 4″ away and move constantly. PVC softens at 300 °F and melts at 350 °F; you want to soften silicone, not the plastic.
How often should I remove and clean the shower drain?
Every 3-6 months for hair removal, annually for full de-scale. Homes with long-haired occupants or hard water (> 120 ppm) benefit from quarterly pulls.
Can I reuse the old strainer after removal?
If the lugs and threads are intact and you clean off all old silicone, yes. Inspect for hairline cracks—replace any strainer that shows white stress marks.
What silicone should I use when reinstalling?
100 % silicone labeled “Plumbing” or “Sanitary.” I stock DAP 08644 (white) and GE Momentive MP (clear). Avoid acrylic or latex—they dissolve in hot water.
Will removing the strainer void my shower warranty?
Not if you follow the manufacturer’s procedure and reseal with approved silicone. Schluter and Wedi both publish removal instructions—stick to them and keep receipts.
Conclusion
Unscrewing a shower drain is a two-minute job when you match the strainer to the correct key and soften the silicone first. Buy the key, heat the rim, and turn—no drama, no cracked plastic, no $400 service call. Do it every six months and you’ll prevent clogs, mold, and the heartbreak of a ruined waterproofing job.
About the Author: Mark Stevens is a licensed plumber with 15+ years specializing in shower waterproofing and drain systems. He’s personally removed over 1,200 drains and holds a Level 3 NVQ in Plumbing. Mark believes every homeowner should own the right drain key and a tube of silicone for five-minute maintenance that saves thousand-dollar repairs.